Although I find myself anxious about writing the blog, or
not writing to be more accurate, I feel it as more of a motivational pressure
rather than a suffocating snuff out the candle flame kind of deal. When I fall
behind in my normal tasks I tend to feel smothered, but not so much for this
project. Every day life has begun to cascade a little bit, covering up the low
priority of playing games to write for strangers: work needs to be done,
obligations fulfilled, errands, & c. Pressure builds up, but never to the
point of stress which is a welcome feeling for someone as high strung as me.
Being able to sit down and complete two levels of Ultima Underworld in one
night felt extremely good. I would estimate myself to be 60-70% finished with
the game and am having a blast. That being said, I am looking forward to
getting into something that doesn’t take as much investment for the next game.
DO feed the trolls!
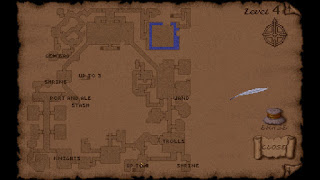
Level 4 is very straightforward. The entire floor is
symmetrically laid out into quadrants: the southwest contains a faction of
knights known as the Knights of theOrder of Crux Ansata, the southeast hosts a clan of trolls, and the northern
half is made up of two substantial puzzles. What is also interesting is that
unlike the other levels I have experienced, the entire southern half of level four is relatively safe with no hostile monsters aside from a few spiders
whereas the northern side is a death trap. Taking the time to speak with each
faction, I was able to piece together a much bigger picture in terms of lore
and how the abyss had been settled.
The Stygian Abyss is only a dungeon because it has been
retaken by nature. When it was being settled by Sir Cabirus, the entire Abyss
was meant to be a shining example of understanding and virtue. Before his death,
the entire colony was living in peace and working together to make life
underground more comfortable, but since his death, everything has reverted back
to its original state. Not to mention that this puts a very sinister slant on
the entire situation of those remaining factions being locked in with prisoners
being added to the population all the time. What in the heck was Lord British
thinking?
Regardless, level four is in relative peace as the Knights
and trolls live side by side in a sort of détente even though a few feral
trolls and crazy knights have run off on their own. This is where I entered the
picture. Speaking to the trolls, I found they did not have much to say but were
in possession of their own shrine of virtue I was able to use to gain some more
skills. I was also able to trade a rotworm stew I had made with a recipe from
the goblins of level one for a set of dragon scales with one of the trolls. The
Knights were more helpful and even offered to make me a member of their order
if I recovered some lost artifacts. The first of these was a eulogy that was
lost in the trolls’ shrine I was able to return immediately. I was then sent to
find a lost golden plate in the maze to the northwest. Talking to a few of the
order’s members, I was also told of another puzzle known as the “bullfrog
puzzle” to the northeast.
What excited me most about this portion of the game is that
the main quest finally started to gel a little bit. I love the moment in many
old games where the mists begin to clear and I find seemingly unconnected
pieces suddenly falling into place. Since there are no mission markers or
objective lists being ticked off, it is completely up to me to gauge my own
progress which can be overwhelming sometimes. I find myself missing this in
modern games as everything seems to be shepherded along in fear that players
will get confused, which they very well may. Ultima Underworld began this
process here as I completed the Knights’ quest.
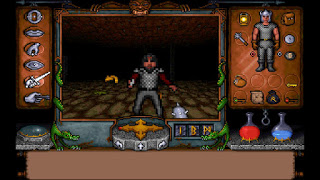
Charged with the task of killing the renegade ‘Chaos Knight’Sir Rodrick, I headed to the former feast hall of the humans and trolls to face
him. I had leveled up my combat and cudgel skills to take him down and was able
to after a bit of running and hiding to heal. A key he dropped opened the maze
I was looking for, at the end of which I found the gold plate. I returned it in
exchange for the Standard of Honor; one of the eight talismans of virtue! This
luck continued as I talked to a knight lamenting the theft of the Taper ofSacrifice by a crazed madman obsessed with staving off darkness. Knowing I had
talked to a guy fitting that description on level three, I quickly returned and
easily traded some food for it. I was now in possession of two out of eight
talismans within twenty minutes. The pace was picking up quickly.
This streak continued as I traded the gem cutter I got on
level two for defeating the gazer in the mines to another knight who clued me
in on the switch sequence to get the ring of Humility! I used this momentum to
propel myself through one of the hardest puzzles I have faced in the game so
far: the bullfrog puzzle.
More platforming…
The bullfrog puzzle harkens to one of those idiosyncrasies
that most games with dungeons have: weird and obtuse puzzles. This one is
especially esoteric as no instructions or hints are given at all. The room is
simply a platform with two rotating levers with eight positions, two buttons
that are either on or off, and a giant square plot of dirt surrounded by a
moat. After ten minutes of messing around and getting frustrated, I had figured
out that each press of the top button moves a piece of dirt up one ‘level’
while the lower button moves it down. Despite this revelation, I was unable to
see what relation the rotating dials have to do with what area is raised. As
far as I can tell, one lever corresponds to the ‘x’ axis of the square while
the other is the ‘y’ axis, just like on a graph. Then, each button press raises
the level of the selected coordinate. The complicated part is that a few
squares SURROUNDING the selected coordinate are raised too making my ‘just
raise every position two levels’ strategy non-workable. Somehow, I accidentally
cleared a path to the far northeastern corner of the room where another
platform was made available. I still don’t understand how it worked or what I
did, but it’s done.
Proceeding through this newly revealed corridor, I found
stairs down to a set of tombs in level four in which I found the hilt of the
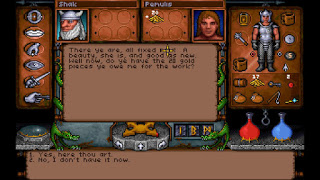
sword of justice! Returning the sword to Shak, he agreed to repair the thing in
an hour giving me three out of the four required talismans to complete the
game! The only problem is repairs are in real time. It literally takes an hour
of in game time. Luckily, I was able to use the bedroll to sleep for this one
and get the sword immediately, but repairs I had done for lesser equipment had
consisted of me bringing the weapon or armor to Shak and leaving the game
running while I did something else for ten minutes until the repair was done. I
am not a big fan of that design decision.
In the end, I had three out of the eight talismans and had
completed level four of the abyss. With things coming together quickly, I am
hoping I can complete the game within the next two weeks. But… we all know how
my scheduling goes so this may not come to bear. Anyway, it’s time to pump my
sword stat so I can use this indestructible Sword of Justice for the rest of
the game. I hope all of the other items are as useful as this one.
What’s next?
I have already completed level five of the abyss and will be
posting about it shortly. In the meantime I hope to work ahead of schedule and
have the game finished ahead of the blog content so I can post more regularly.
I apologize for the slower pace, but daily life has been hectic lately and I’m trying
to play in the middle of all that. Until next time, see you on level five of
the Stygian Abyss; definitely the strangest one yet.
--Backlog Killer